Wednesday, October 16, 2013
Halloween Boo-tiful Bannister
Friday, May 24, 2013
Scrapbook Paper Monogram... Classy-fi It!!
 |
| Pin It Now! |

Here is an inexpensive, simple way to deck your halls with a dollar store picture frame and 2 sheets of your favorite scrapbook paper (I've had these laying around for a few years, I dont really scrapbook). Here are the super simple Classy-fiing steps...
Step one: Print up your favorite letter in your favorite font in a size that will fit your frame.
Step two: Cut out the letter
Step three: Trace the letter upside down on the back of scrapbook paper.
Step four: Cut out the letter
Step five: Cut a contrasting scrapbook paper to fit the full frame.
Step six: Center and glue your letter to the full frame scrapbook paper
Step seven: Put it in the frame... Your done!!
I'm sure you could get fancy and use a Cricut or a Vinyl Cutting machine, but I used a simple pair of scissors and a steady hand. Go on and Classy-fi It!!
Sunday, March 3, 2013
Classy Makeup Tip: No Mess Smokey eyes!
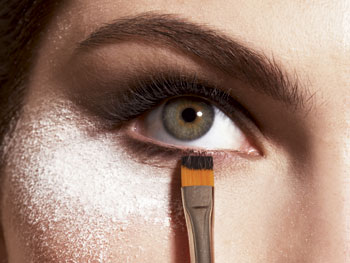
As a professional makeup artist, when it comes to smokey eyes time after time I see almost as much smoke under the eye as on the lid. Making the poor girl look as if she has already been out all night before she stepped out of her bathroom. NOT CLASSY!! Well when it comes to a clean looking smokey eye, you need to take precaution. I saw this advice on Oprah once... and I believe Kevin Aucoin had this same advice as well.

Apply loose powder under the eye over your foundation and concealer to protect it. When your done smoldering your eyes.. swish the dirty powder away with a fan brush. My question is how many of us actually have a fan brush in our makeup bag? Heck I'm a makeup artist and I dont even have one in my personal makeup bag.
It definitely works getting the excess powder off, BUT if your like me and have lovely lines under your eyes, 9 times out of 10 that excess powder over-sets your concealer and then its cakey. While I don't entirely disagree with this method, (great for Halloween).
I like my method much better.
It's so genius, you will not believe it!
DO YOUR EYES FIRST!! Yes girls before foundation, before concealer, before anything. This way you can blend vigorously, go on.. make messes.. smudge away. When your done with your eyes, use a makeup wipe to clean the excess shadow you don't want all over your face, (no black freckles please) THEN apply your foundation and concealer. It makes for a beautiful finished face.

No foundation under the eyeshadow 8 times out of 10 it will crease and seperate, use an eyeshadow base, like I recommend here.
Keep in mind it can be hard to judge how much or how little shadow to use, the first few times you may think you need more because you don't have that smooth skin palette in front of you. I never let the girl in my chair see their eyes before I've put foundation and concealer on, they cant see past the discoloration and pimples, but trust me grasshopper... Once you figure this out, your ways will be changed forever....
Thursday, January 17, 2013
What to do with those Baby Shoes?
So there is a huge gap between my youngest and my middle child. And photography has changed so much in the last decade. I just couldnt bring myself to go to the department store photographer I took my first two babies two the first time around. I even stopped hanging their cute baby pictures in my home for all the world to see.
Then I decided I would take them and have some custom mats made to crop out all the dropsheet backgrounds and such. They cost me $6.00 each at Hobby Lobby, a bit more than I really wanted to spend but I'm happy with the results. I reused the 10x13 photo frames from the first two and just spray painted a random 10x13 frame to match for the new addition. Since this blog is about making do with what you got, I decided for now its just fine. Initially the first two hung in landscape style, now they hang portrait style.
Then I decided I would take them and have some custom mats made to crop out all the dropsheet backgrounds and such. They cost me $6.00 each at Hobby Lobby, a bit more than I really wanted to spend but I'm happy with the results. I reused the 10x13 photo frames from the first two and just spray painted a random 10x13 frame to match for the new addition. Since this blog is about making do with what you got, I decided for now its just fine. Initially the first two hung in landscape style, now they hang portrait style.
My initial thought, was to find some Letter Hooks (ha ha pun intended) but then I found these knobs at Hobby Lobby for .62 cents each, SCORE. Then I purchased wooden letters at .77 cents for 4. then painted them. I did have to spray-paint the hardware on the knobs since I'm not into rustic metals.
Then I sewed the baby shoes to the ends of white ribbons and tied them accordingly so they hung in similar fashions. My son's baby shoes could have hung by the laces but I opted for symmetry since the girl shoes didn't have laces.
Pin it if you Like it!
Laters... MaryMaryRC
Subscribe to:
Posts (Atom)


